Payment gateway integration is always a challenge for a developer. Mostly the App developers making apps on Niotron, Kodular, or any other AI2 builders. There are a few extensions available and also some server-based integration too. But today we’ll learn how to set up Razorpay Payment gateway integration by using payment links API and builder default components of Niotron builder.
Please note that we are going to perform the testing in Sandbox mode.
Get Razorpay Credentials
Visit the Razorpay dashboard and log in/register to your account. Here we can get our Key ID and Key Secret which we use to create API requests for generating a payment link from Dashboard >Settings > API Keys. For more info visit the Razorpay docs page.
Designer Part
Open your project (builder.niotron.com or you can use this method on any AI2 builder). Please note that the Amount textbox input type is set to Number.
Blocks Part
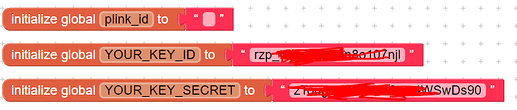
Here first we have to create three global variables.
- plink_id
- YOUR_KEY_ID
- YOUR_KEY_SECRET
Now On Pay now button click. We have to generate an auth token. Please note that all Razorpay APIs are authenticated using basic auth. For more info on this, you can visit the Razorpay API Reference docs.
Also, we need to provide Content-type along with Authorization in the header.
Create Payment Link
We have the option to create basic or customized Payment Links. To generate a payment link we have to make a POST request on Razorpay payment API URL along with the payment info like
- Amount – It must be in the smallest unit of the currency. For example, if you want to receive a payment of ₹299.95, you must enter the value 29995.
- Currency – A three-letter ISO code for the currency in which you want to accept the payment. For example, INR.
- Callback/Redirect URL – Once customers completes the payment, they are redirected to the specified URL.
- Callback Method – Default value is set to get
We are going to make this POST request when the user clicks on the button.
In response to this API request, we’ll get the payment link/URL (short_url) along with a plink_id (id). Click here to view the JSON response we received in response.
Now here we’ll store the value of id in the plink_id global variable for further use and load the short_url in Web Viewer. Also, we are using a Clock component to keep track of URL change so that, when the user completes the payment Razorpay will redirect the user to our given redirect/callback URL.
Example Of Redirect URL
https://example-callback-url.com/?razorpay_payment_id=pay_Fc8mUeDrEKf08Y&razorpay_payment_link_id=plink_Fc8lXILABzQL7M&razorpay_payment_link_reference_id=TSsd1989&razorpay_payment_link_status=partially_paid&razorpay_signature=b0ea302006d9c3da504510c9be482a647d5196b265f5a82aeb272888dcbee70eOnce the user is redirected to callback/redirect URL. We can see it contains few parameters. So we’ll check the value of parameter payment_link_status. If the value is paid it means the payment is done successfully. So now we can display the status of the payment.
Additional Procedures
We should make a simple procedure to convert/parse parameters from URL and return them as JSON. Please note that this is not compulsory you can skip this and work with any alternative method.
Payment Cancel Button
As we are using Web viewer to load our payment/short_url for processing the payment. We need to provide a Cancel button so if the user wants to cancel it he/she can do it easily. For that, we’ll add a cancel button at the bottom of the web viewer arrangement. Now when a user clicks on this button we have to cancel the payment by making another API request to ensure safety.
In this request, we don’t have to pass anything in the body of the POST request.
Now once we get the response, We simply have to display the status of the payment as Payment Cancelled.
Congratulations! we have successfully integrated the Razorpay payment gateway into our app.
I am providing the demo AIA file so you can have a look and give it a try. If you have any queries or suggestions feel free to write them in the comments below.
Important Links
- Download Demo AIA
- Visit Niotron Community Post
- Video Tutorial (Coming Soon)